Friday, 16 January 2015

Sound Files

Sound Files

This screenshot shows that I have found the sound that I want to use in my 2D animation which is the T'Rex 2D animation. The sound that I want to use is the Jurassic Park T'Rex roar.


This screenshot shows that I have downloaded the T'Rex roar as a .wav file and I am importing the sound file into the library.


This screenshot shows that I have imported the sound file into the library.


This screenshot shows that I have put the sound of the T'Rex roar onto the stage from the library and that I have put it onto the timeline on the key frames.


This screenshot shows that I have tested my 2D animation with sound and it works.


This screenshot shows that I have exported my 2D animation by going to File>Export Movie as an windows AVI and I have saved it as a .fla file.


This shows that I have successfully added sound to my 2D animation.


Friday, 9 January 2015

Putting in Text

Putting in Text

This screenshot shows that I am going to put some text onto this 2D animation. This is a 2D animation that I have done earlier and on this 2D animation the T'Rex's tail moves up and down.


 This screenshot shows that I have inserted some text and I did that by clicking on the Text icon in the toolbar and the Text column at the top of the screen which allows me to edit my text. The text that I have inserted says 'RRRROOOOAAAARRRR!!!!' because that's what a T'Rex says.


This screenshot shows that I have edited the text. I have edited the text by changing the colour of the text to green and that I have made the text bold changed the font to Jokerman and have moved the position of the text and have scaled the size of the text to make it bigger.


This screenshot shows that I have inserted some shapes which are ovals and I inserted these using the oval shape tool. I have changed the line colour to green and the inside colour to blue and green.


This screenshot shows that I have applied a tween to the text by using Modify>Convert to Symbol>Graphic before I added into a key frame. Then I added it it to a key frame.


This screenshot shows that I have successfully added text into a 2D animation. The text comes up at the end of the animation after the T'Rex puts his tail down. I have exported this 2D animation by going to File>Export Movie as an animated gif and I have saved it as a .fla file. 


Friday, 21 November 2014

Layers and Registration

Layers and Registration


I am using the T'rex image that I made last lesson and make it move. The file name of this is  T'rex.fla.


I have lassoed the tail of the T'rex. I have done this to make the tail move. Then I went on Modify>Convert to Symbol >Graphic for the tail.


I went on the original image and erased the tail on it. I also colored in the spaces so there was no white spaces when the tail moves.


Then I Drag the registration point  to the pivotal point on the tail. I did this by going on Free Transform>Change Registration Point. Then I selected key frame 50 and I made sure that both of the images are visible when it moves.


I have rotated the tail on the T'rex. Then I applied a classic tween to the timeline. Then I tested it by going on Control>Test Movie to preview it and it worked. So I Exported as an animated gif it and saved it as a .fla file.


Friday, 10 October 2014

2D Animation Scale and Rotate Exercise

      I have created a new flashFile Action Script 3.0 in Flash CS6. Then I changed the size of the stage to 600 pixels by 550 pixels and I have a frame rate of 25fps.


Then I imported the image of the green eye into the library in flash. Then I put the image of the eye onto the stage.


 After I put the eye on the stage I converted the eye into a symbol as a graphic by using Modify>Convert to.


I changed the size of the eye by using Modify>Transform>Scale to reduce the image in Frame 1 to a maximum of 40 px in height.


 Then I selected key frame 100 and I made the eye bigger by using Modify>Transform>Scale to enlarge the Eye and to fill the stage but I made sure to not overlap the edges.


I have flipped the image vertically by using Modify>Transform>Flip vertical and I used the right Mouse button to create a Classic Tween.


 I have saved the animation and I have exported as a animated gif.


Friday, 3 October 2014

Shape tween exercise

2D ANIMATION shape Tween Exercise


I have created  a New File Action Script 3.0 in Flash CS6 that  I  have a frame rate of 25fps and a stage size of 550 pixels by 400 pixels.


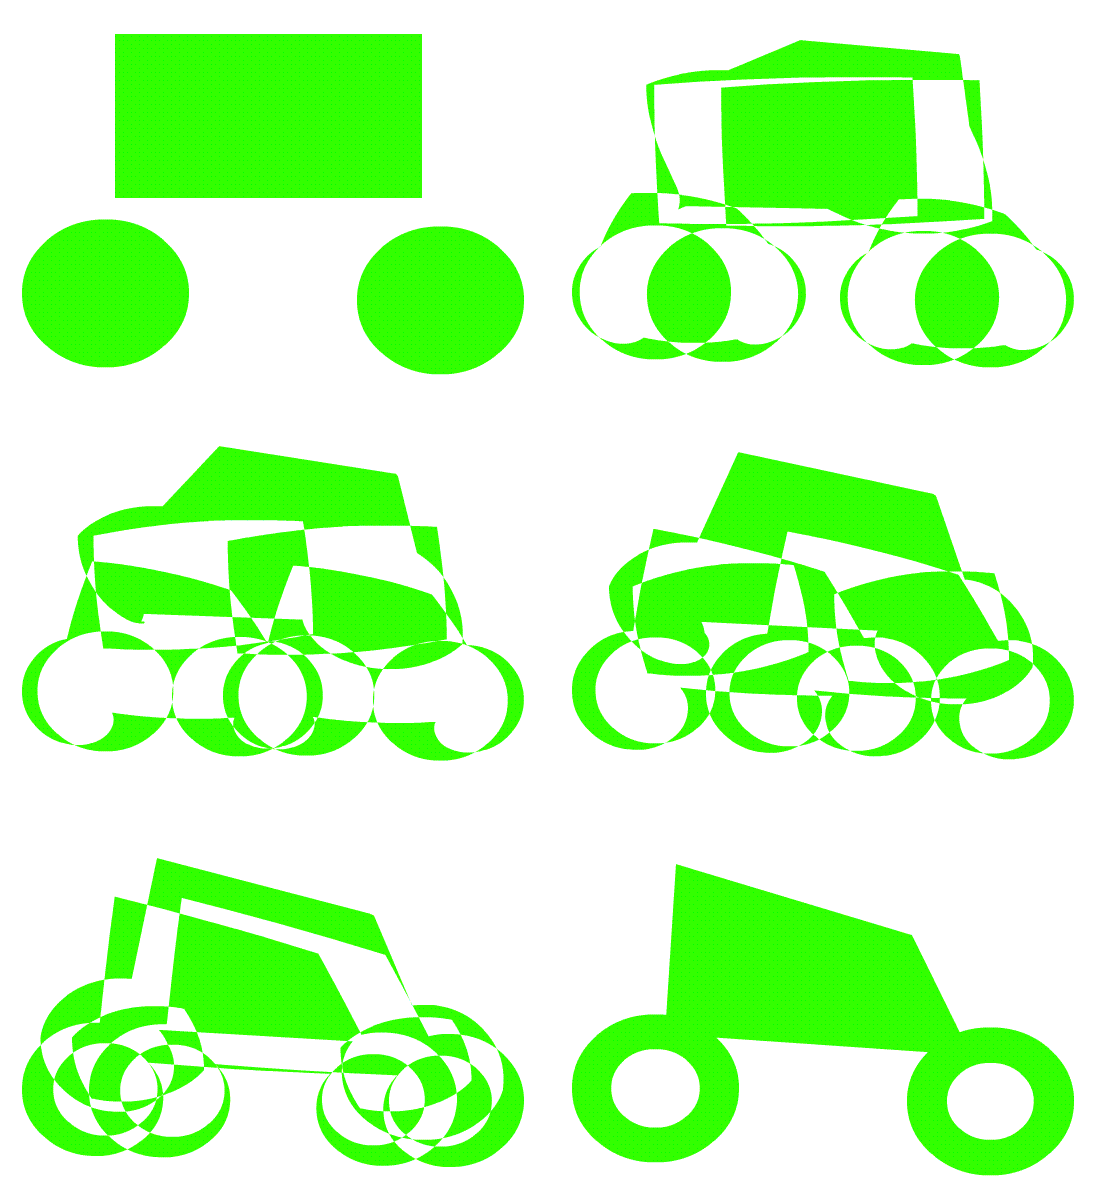
    This is an image of the first shapes which I put onto the stage and they are 2 primitive ovals and 1 rectangle and I put them on the stage by using the shape tool.


I selected a key frame of 100 on the timeline.


I have moved the anchor point son the shapes to distort them and I have turned the shapes into the shape of a car. Then I placed the right mouse button over the shapes and I selected shape tween.


  After i finished I tested my animation and it worked and then I saved it by going on  Save as and saving it as a .fla file. Then I exported it as a animated gif to put on my blog.


This is my finished animation


Friday, 26 September 2014

2D Animation Motion Tween Exercise

This is a blank stage where I am going to start my 2D animation. But before I started I made sure that I have a frame rate of 25fps and a stage size of 550 pixels by 400 pixels which is on the right of the screen.


The next thing that I did was to import the image of the rocket onto the stage.


This image shows that I have imported the image of the rocket into the library which I can put onto the stage. Then the next thing that I did was to convert it to Symbol and save the rocket file as a Graphic.


Then I selected the key frame 75 on the timeline which is the end of the 2D animation.


Then I put the image of the rocket on the stage and then I dragged the rocket file off stage and click Frame 1 on the timeline.


Then I dragged the rocket image in a straight line to the right off stage and I selected Key Frame. After I did that I placed the right Mouse button over the rocket and selected Classic Tween.


     Then I tested it and it worked good. Then I saved it and exported it. When I saved it I went on save as .fla file and export as animated gif to put on my blog.